Purchases Module Guide
Manage your business expenses and vendor bills. This guide explains how you record money going out to suppliers, claim back VAT, and track what you owe.
How the Purchases Module Works
The Purchases page is where you record everything you buy for your business. By tracking this carefully, you legally reduce the amount of tax you have to pay the government at the end of the year, and you can claim back the VAT you spent.
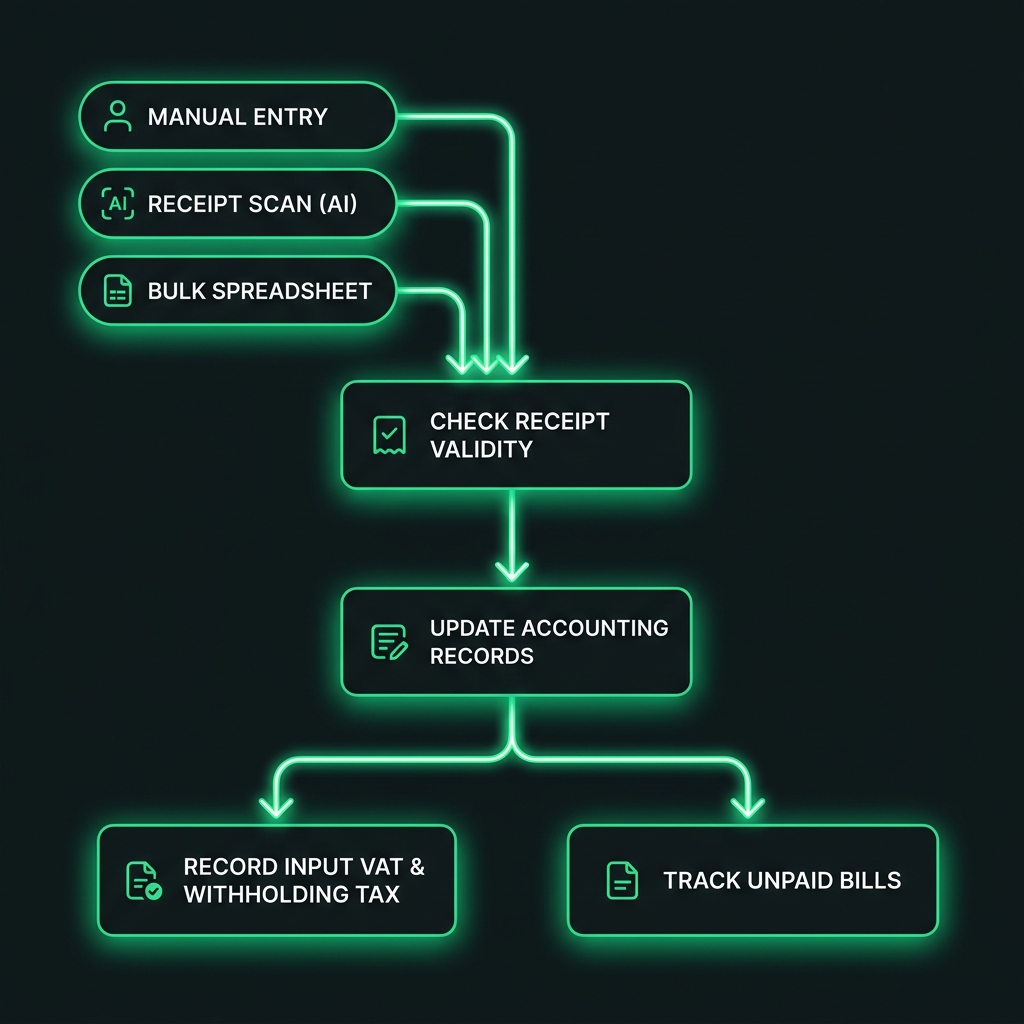
Visualizing the automated purchases process: Entry → Check Validity → Update Accounting → Record Tax & Track Bills.
1. The Information We Track
When you enter a purchase from a supplier, we save these important details so your tax claims are never rejected:
- Who you bought from: The Supplier's Name and Tax ID (TIN). This proves you bought from a registered business.
- The Receipt Number: The exact FS Number printed on the receipt they gave you.
- Claiming Back Tax (Input VAT): If the item included VAT, we split that out. The government allows you to subtract this VAT from what you owe them later.
- Expense Category: You categorize what you bought (like "Office Supplies", "Rent", or "Inventory"). This builds your profit and loss report automatically.
Capital purchases and fixed assets
When a line is classified as a capital purchase (e-Tax types 1, 2, or 6), choose an asset category in the Asset column on manual entry or receipt confirmation. Optionally check Create fixed asset on save to register the asset when you save. You can still capitalize later from the purchase list.
Posting capital lines to the General Ledger debits the category's fixed-asset account when an asset is linked; uncapitalized capital lines may post to expense until you capitalize.
2. Automatic Bookkeeping for Expenses
Just like with sales, entering a purchase automatically updates your accounting books to show your new expenses and tax credits.
For example, if you buy office supplies for 1,150 Birr (which includes 150 Birr VAT):
- We record that your business has a new Expense of 1,000 Birr (which lowers your yearly profit tax).
- We record that the government owes you 150 Birr in VAT credit.
- We record that you owe the supplier 1,150 Birr.
3. Automatic Reminders for the 3% Withholding Tax
Ethiopian law requires that if you buy goods worth more than 20,000 Birr (or services over 10,000 Birr), you cannot pay the supplier the full amount. You must hold back 3% and pay it to the tax office for them.
- Our system constantly watches how much you spend on every receipt.
- If your purchase goes over the legal limit, the system instantly pops up a warning reminding you to hold back the 3%.
- It automatically calculates the exact 3% amount.
- It prepares the special "Withholding Receipt" that you need to print and give to the supplier as proof.
- It adds this 3% to a list of money you need to send to the tax office at the end of the month.
4. Tracking Who You Owe (Unpaid Bills)
When you enter a purchase, the system puts it on your "Unpaid Bills" list (Accounts Payable).
- You can log partial or full payments when you actually pay the supplier.
- You can record if you paid them from your Cash register or via a Bank Transfer.
- Once you log the payment, the bill is marked "Paid" and removed from your outstanding debts list.
5. Buying Big Things (Assets vs. Expenses)
The system treats small everyday purchases differently from large, long-lasting items.
- Regular Expenses: Things like paper, electricity, or minor repairs. These reduce your profit immediately in the current month.
- Fixed Assets: Things like computers, cars, or furniture. If you categorize a purchase as an Asset, the system knows not to deduct the whole cost today. Instead, it places it in your "Asset List" so you can slowly deduct its value over several years (Depreciation).
6. Checking if Receipts are Real
You can only claim a tax discount on purchases if the person who sold it to you actually reported the sale to the government. If they gave you a fake receipt, you get in trouble during an audit.
Gibir-Negari uses a smart automatic tool to quietly log into the government's website. We verify that the receipt number you typed in is real and officially reported by the seller, keeping you completely safe from penalties.
The Purchases interface where you record vendor bills and track expenses.
The Purchases Upload interface for bulk importing multiple vendor invoices.
7. Step-by-Step Operations
Here are the common operations you will perform within the Purchases module, along with the steps and navigation links.
AEnter a Single Purchase Manually
- Start the Entry: Navigate to the Manual Purchase Entry Page.
- Basic Details:
- Select the Purchase Date using either the Ethiopian or Gregorian calendar picker.
- Enter the Supplier Name and their 10-digit TIN.
- Enter the Receipt Number and MRC Number (if provided from a cash register).
- Add Line Items: For each item bought, click "Add Item" and enter:
- Purchase Type: Select the e-Tax purchase type (1-8). Note: Types 6 and 7 are completely free of VAT, while others generally include a 15% VAT on the base.
- Unit of Measure & Category: Select how the item is measured (e.g., KG, Piece, Litre) and the VAT category (Goods or Services).
- Amounts: Enter the Quantity and Unit Price.
- Automatic Math: The system instantly calculates the VAT Paid and Gross Value based on the purchase type and vendor tax type (VAT/TOT).
- Income Withholding Tax (3% or 30%): If your purchase goes over the legal limit, the system alerts you to hold back the withholding tax.
- You can enable the Auto-WHT setting to compute it automatically, or manually apply the 3% rate.
- The system records the withheld amount. When saving, you will be prompted to enter the Withholding Receipt Number you gave the supplier.
- Save: Click "Save" (or "Save & Post to Accounting" to instantly update your General Ledger).
BRecord a Payment to Supplier
- Navigate to the Purchases List.
- Find the specific unpaid bill and click "Record Payment".
- Enter the payment amount and select the payment method (e.g., Cash, Bank Transfer).
- Click "Save Payment". The bill will be marked as "Paid" and removed from your outstanding debts list.
CUpload Purchases in Bulk (Spreadsheet)
- On the Purchase Entry Page, switch to the "Bulk Upload (CSV)" tab.
- Download the provided Excel template.
- Fill the spreadsheet with your purchase records (Seller Name, TIN, Purchase Type, etc.).
- Upload the file back into the system. It will auto-detect the vendor types, validate the data, and save all records instantly.
DView Procurement Insights
- Navigate to the Procurement Insights Dashboard.
- Select the Fiscal Year (Ethiopian or Gregorian).
- View interactive charts detailing your gross expenditure, VAT paid, recent trends, and strategic supplier analytics.
EScan a Purchase Receipt (AI Capture)
- Navigate to the Camera Capture (Purchases) page.
- Use your phone or webcam to take a clear photo of a vendor invoice or purchase receipt. Processing starts automatically.
- Wait a few seconds for the AI to extract the Supplier TIN, Receipt Number, Date, and Tax Amounts.
- Review the extracted information for accuracy in the Upload Queue and click "Confirm & Save".
4 Ways to Record Purchases
The Manual Purchase Entry page offers 4 different tabs (entry modes) to match how you receive vendor documents. Each mode is optimized for a specific type of purchase transaction.
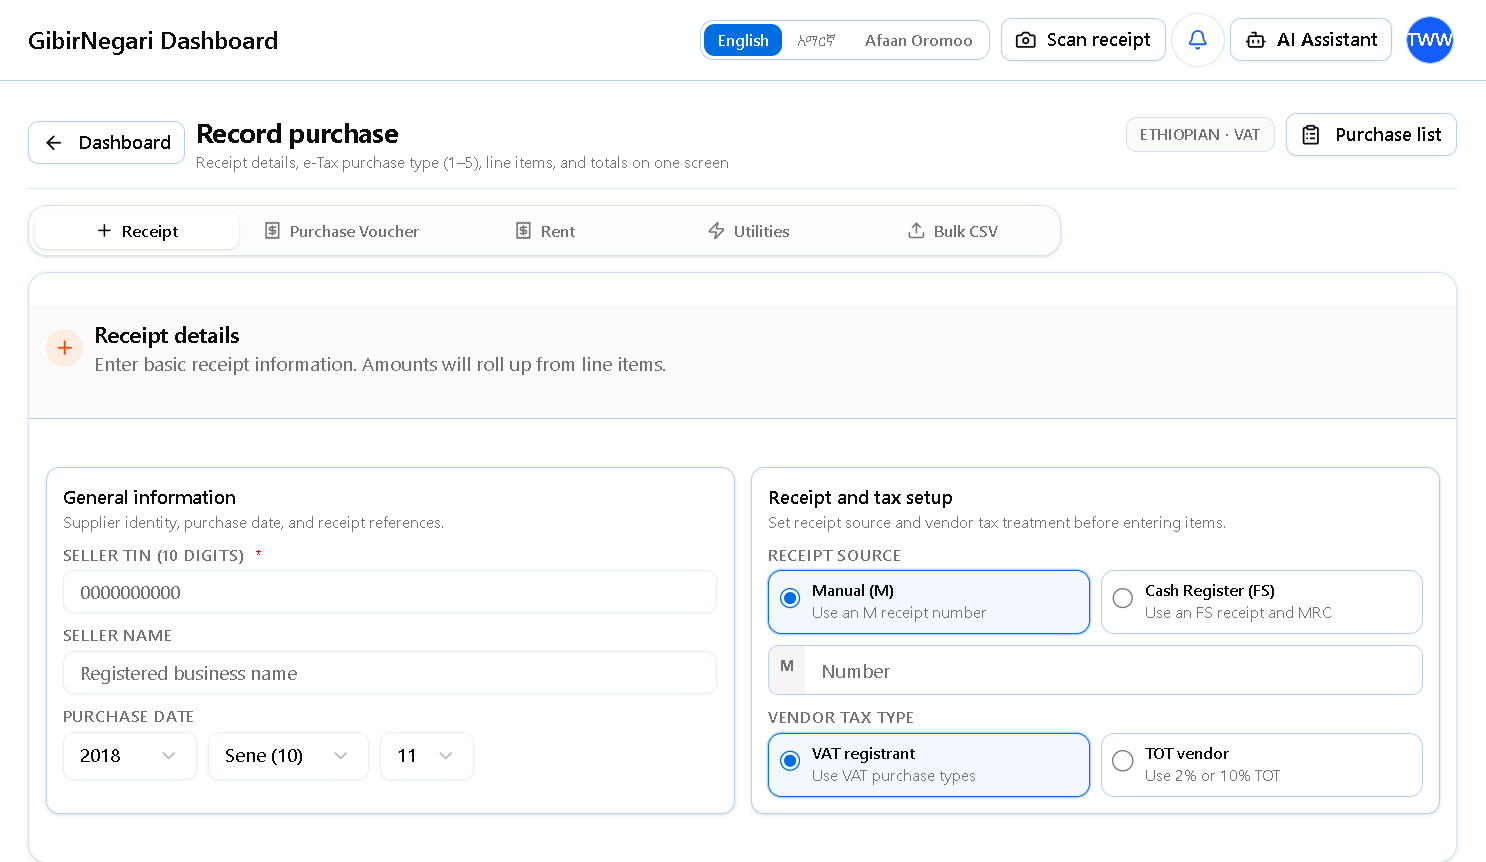
1. Receipt (Standard Purchase)
📋 When to Use
Use this mode when you receive a standard VAT receipt from a registered supplier. This is the most common purchase type for:
- Office supplies, inventory, equipment
- Services from VAT-registered vendors
- Any purchase with a fiscal cash register receipt (FS number)
- Purchases from TOT (Turnover Tax) vendors
🎯 Key Features
Required Information:
- Supplier name and TIN (10 digits)
- Receipt number (Manual or FS)
- MRC number (for FS receipts)
- Purchase date
- Item descriptions, quantities, prices
Automatic Calculations:
- VAT (15%) or TOT (2%/10%) based on vendor type
- Withholding tax (3% or 30%) if threshold exceeded
- Line item totals and gross amounts
- Purchase type-specific VAT rules (types 1-8)
⚙️ How It Works
- Select Receipt Source: Choose "Manual Receipt (M)" or "Cash Register (FS)"
- Enter Supplier Details: Name, TIN, receipt number, MRC (if FS)
- Add Line Items: For each item, specify:
- Description
- Purchase Type (1-8): Determines VAT treatment
- Unit of Measure (KG, Piece, Litre, etc.)
- VAT Category (Goods or Services)
- Quantity and Unit Price
- Automatic WHT: System calculates withholding tax if:
- Goods purchase > 20,000 ETB → 3% WHT (with TIN) or 30% (no TIN)
- Services purchase > 10,000 ETB → 3% WHT (with TIN) or 30% (no TIN)
- Save: Click "Save" or "Save & Post to Accounting"
- WHT Receipt: If WHT applied, system prompts for withholding receipt number
💡 Pro Tip
Purchase Types 6 and 7 are VAT-exempt. Use these for items that don't include VAT. All other types (1-5, 8) include 15% VAT on the base amount.
2. Purchase Voucher (No Receipt)
📋 When to Use
Use this mode when you buy from unregistered vendors who cannot provide a VAT receipt. Common scenarios:
- Purchases from small informal traders
- Buying from individuals (not businesses)
- Agricultural products from farmers
- Any purchase where the seller has no TIN or business license
🎯 Key Features
Seller Types:
- Individual: Person without business license
- Business (No TIN): Unregistered business
- Business (With TIN): Registered but no receipt
Withholding Tax Rules:
- 3% WHT: If seller has TIN or business license
- 30% WHT: If seller has neither TIN nor license
- Threshold: > 20,000 ETB for goods, > 10,000 ETB for services
⚙️ How It Works
- Select Seller Type: Individual, Business (No TIN), or Business (With TIN)
- Enter Seller Details:
- Seller name (required)
- TIN (if available)
- Business license collected? (Yes/No)
- Purchase date
- Add Line Items: Description, quantity, unit price (no VAT - these are non-VAT purchases)
- Automatic WHT Calculation: System calculates 3% or 30% based on seller type and threshold
- Compliance Check: System validates:
- TIN required if business license collected
- WHT applied if threshold exceeded
- All required fields completed
- Save: System generates internal voucher reference number
⚠️ Important
Purchase vouchers are for non-VAT purchases only. You cannot claim VAT input credit on these purchases. Use the "Receipt" mode for VAT-registered vendors.
3. Rent Expense
📋 When to Use
Use this mode specifically for rent payments to landlords. This mode has special rules for rent withholding tax:
- Office rent
- Warehouse rent
- Equipment rental
- Property lease payments
🎯 Key Features
Landlord Information:
- Landlord name (required)
- Landlord TIN (optional)
- Business license status
- VAT registration status
- Receipt information (if provided)
Rent WHT Rules:
- Threshold: > 10,000 ETB
- 3% WHT: If landlord has TIN or business license
- 30% WHT: If landlord has neither
- 0% WHT: If rent ≤ 10,000 ETB
⚙️ How It Works
- Enter Landlord Details:
- Landlord name
- TIN (if available)
- Business license collected? (Yes/No)
- VAT registered? (Yes/No - only if business license)
- Receipt Information (Optional):
- Receipt available? (Yes/No)
- Receipt source (Manual or Cash Register)
- Receipt number and date
- MRC number (if cash register)
- Add Rent Items: Description, quantity, unit price
- VAT Calculation: If landlord is VAT registered, system calculates 15% VAT
- Automatic WHT: System calculates rent withholding tax based on:
- Total rent amount
- Landlord TIN/license status
- 10,000 ETB threshold
- Compliance Validation: System checks:
- TIN required if business license collected
- Receipt details required if receipt available
- WHT applied if threshold exceeded
- Save: System generates rent reference number if no receipt
💡 Example
Scenario: Monthly office rent of 50,000 ETB
Landlord: Has TIN, VAT registered
Calculation:
- Rent (before VAT): 43,478.26 ETB
- VAT (15%): 6,521.74 ETB
- Total: 50,000 ETB
- WHT (3% of rent): 1,304.35 ETB
- Net payment to landlord: 48,695.65 ETB
4. Bulk CSV Upload
📋 When to Use
Use this mode when you have many purchases to record at once. Perfect for:
- End-of-month bulk entry
- Importing from another system
- Recording multiple receipts collected over time
- Migrating historical purchase data
🎯 Key Features
CSV Template Columns:
- purchaseDate, dateCalendar (G/E)
- sellerName, tin
- vatReceiptNo, mrcNumber
- vendorTaxType (VAT/TOT)
- description, purchaseType
- unitOfMeasure, vatCategory
- quantity, unitPrice
Automatic Processing:
- Auto-detects vendor type (VAT/TOT)
- Validates all data before saving
- Calculates VAT/TOT automatically
- Shows row-by-row error messages
- Saves valid rows, skips invalid ones
⚙️ How It Works
- Download Template: Click "Template" button to download CSV template with sample data
- Fill Spreadsheet: Open in Excel/Google Sheets and fill with your purchase data:
- One row per purchase line item
- Use Ethiopian (E) or Gregorian (G) dates
- Vendor type auto-detected from TIN
- Optional fields can be left blank
- Upload File: Drag & drop CSV file or click to browse
- Preview & Edit: Review uploaded data in table:
- Edit cells directly in the preview table
- Remove invalid rows
- Check date formatting
- Validate & Upload: Click "Upload" to process:
- System validates each row
- Shows success count and error details
- Valid rows saved immediately
- Invalid rows listed with error messages
- Review Results: Check upload summary:
- Total rows processed
- Successfully saved items
- Errors by row number
💡 Pro Tips
- Keep the template header row unchanged
- Use consistent date format (DD/MM/YYYY)
- Vendor type is auto-detected - leave blank or specify VAT/TOT
- MRC number only required for FS (cash register) receipts
- Save your CSV as UTF-8 encoding to avoid character issues
Quick Comparison
| Feature | Receipt | Voucher | Rent | Bulk CSV |
|---|---|---|---|---|
| Best For | Standard VAT purchases | Unregistered vendors | Rent payments | Multiple purchases |
| Receipt Required | ✅ Yes | ❌ No | ⚠️ Optional | ✅ Yes |
| VAT Claimable | ✅ Yes | ❌ No | ✅ If VAT registered | ✅ Yes |
| WHT Threshold | 20K goods / 10K services | 20K goods / 10K services | 10K rent | Auto-calculated |
| Entry Speed | Medium | Fast | Medium | Very Fast |
| Compliance Check | ✅ Full | ✅ Full | ✅ Full | ✅ Batch validation |
Page Interactions & Features
Here is a detailed breakdown of what you can do on each of the main pages within the Purchases module and the features available through various buttons.
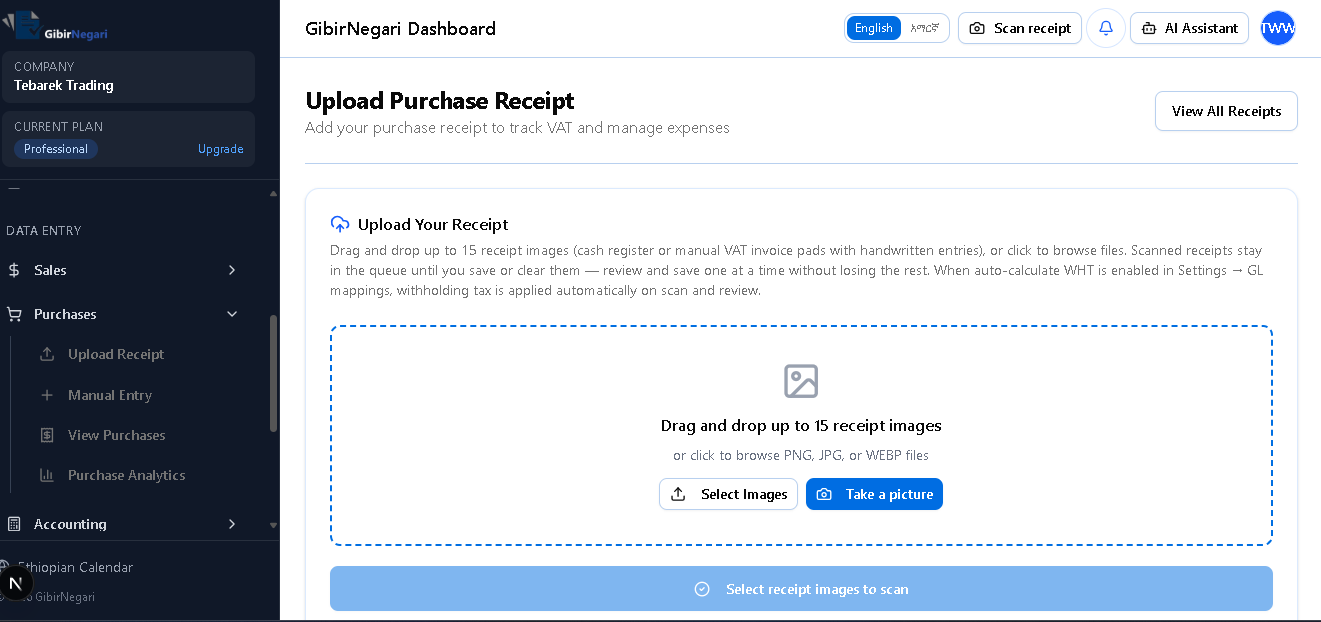
1Upload Receipt Page
This page is dedicated to extracting purchase data from physical vendor receipts using AI. Instead of typing everything manually, you provide an image of the receipt.
The Purchase Upload page where you can drag and drop vendor receipts for AI-powered data extraction.
- "View All Receipts" Button: Located at the top, this button takes you to the queue where you can view all the purchase receipts you have uploaded and their current AI processing status.
- "Select Images" Button / Drag & Drop Area: Click this to open your device's file browser and choose existing photos of purchase receipts, or simply drag and drop up to 15 images directly into the area.
- "Take a picture" Button: Opens your device's camera so you can snap a photo of a physical vendor receipt directly into the system.
- Once images are provided, the AI robot scans them to automatically extract details (Supplier TIN, Receipt Number, Tax Amounts). Because they stay in the queue, you can safely review and save them one by one.
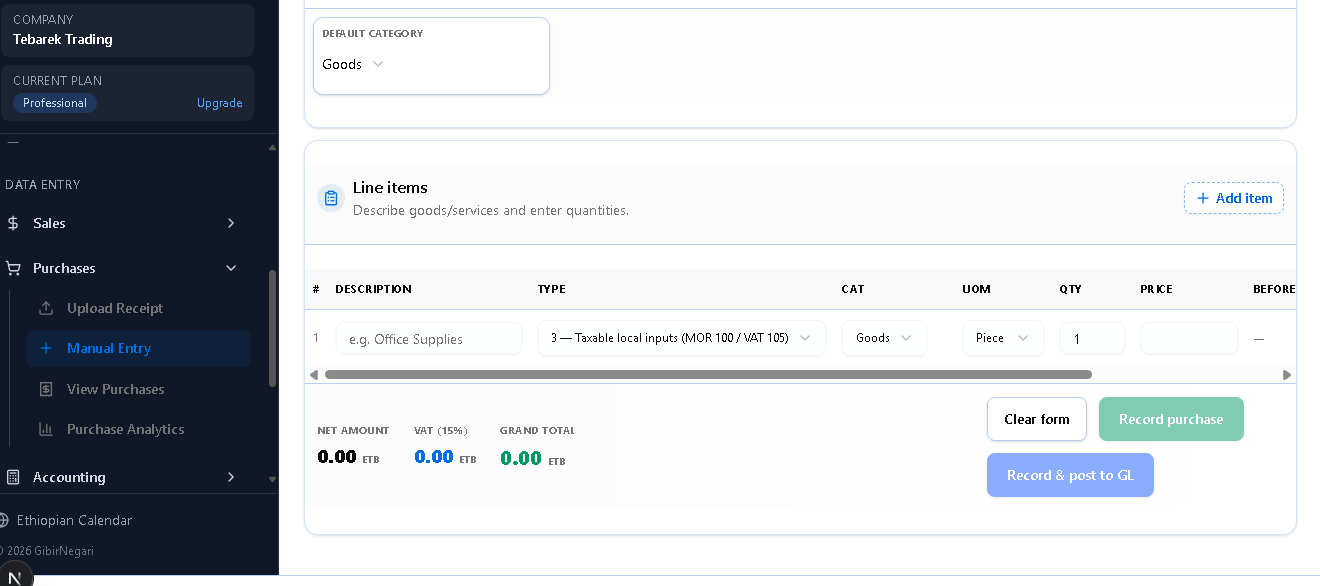
2Manual Entry Page
Use this page to manually enter a purchase or to upload multiple purchases via a CSV spreadsheet. It supports 5 different entry modes.
The Manual Purchase Entry page for recording individual vendor bills or bulk uploading via CSV.
- Active Regime Indicator: Located at the top right, this badge shows your currently active calendar (Ethiopian or Gregorian) and tax type (VAT or TOT) so you always know how your entries will be processed.
- "View Purchases List" Button: Located in the header, allowing quick navigation to your previously saved and posted purchases.
- "Back to Dashboard" Button: Located at the top left to return to the main home screen.
- "Receipt" Tab: Standard purchase from a VAT or TOT registered supplier with a fiscal receipt (FS number or Manual).
- "Purchase Voucher" Tab: For purchases from unregistered vendors who cannot provide a VAT receipt.
- "Rent" Tab: Specifically for rent payments to landlords, with special rules for rent withholding tax.
- "Utilities" Tab: For recording utility expenses like electricity, water, and telecom bills.
- "Bulk CSV" Tab: Switches to a drag-and-drop zone for uploading a CSV file of multiple purchases. Includes a "Download Template" button.
- "Receipt Source" Radio Buttons: Choose between a Manual Receipt (M) or Cash Register Receipt (FS), which prompts for the MRC Number.
- "Vendor Tax Type" Toggle: Switch between VAT and TOT to match the supplier's registration type. The system adjusts all tax calculations automatically.
- "Purchase Type" Dropdown: Select the e-Tax purchase type (1–8). Types 6 and 7 are VAT-exempt; all others carry 15% VAT.
- "VAT Category" Toggle: Mark each line item as Goods (G) or Services (S), which affects the withholding tax threshold.
- "Add Item" Button: Adds a new blank row to the line items table for another product or service purchased.
- "Clear Form" Button: Resets all inputs so you can start a new entry.
- "Record Purchase" Button: Saves the entry as a Draft without posting to the accounting ledger.
- "Record & Post to GL" Button: Finalizes the purchase and immediately posts it to your General Ledger.
3View Purchases Page
This is your main dashboard for tracking all purchase records, managing drafts vs. posted entries, and handling withholding tax compliance.
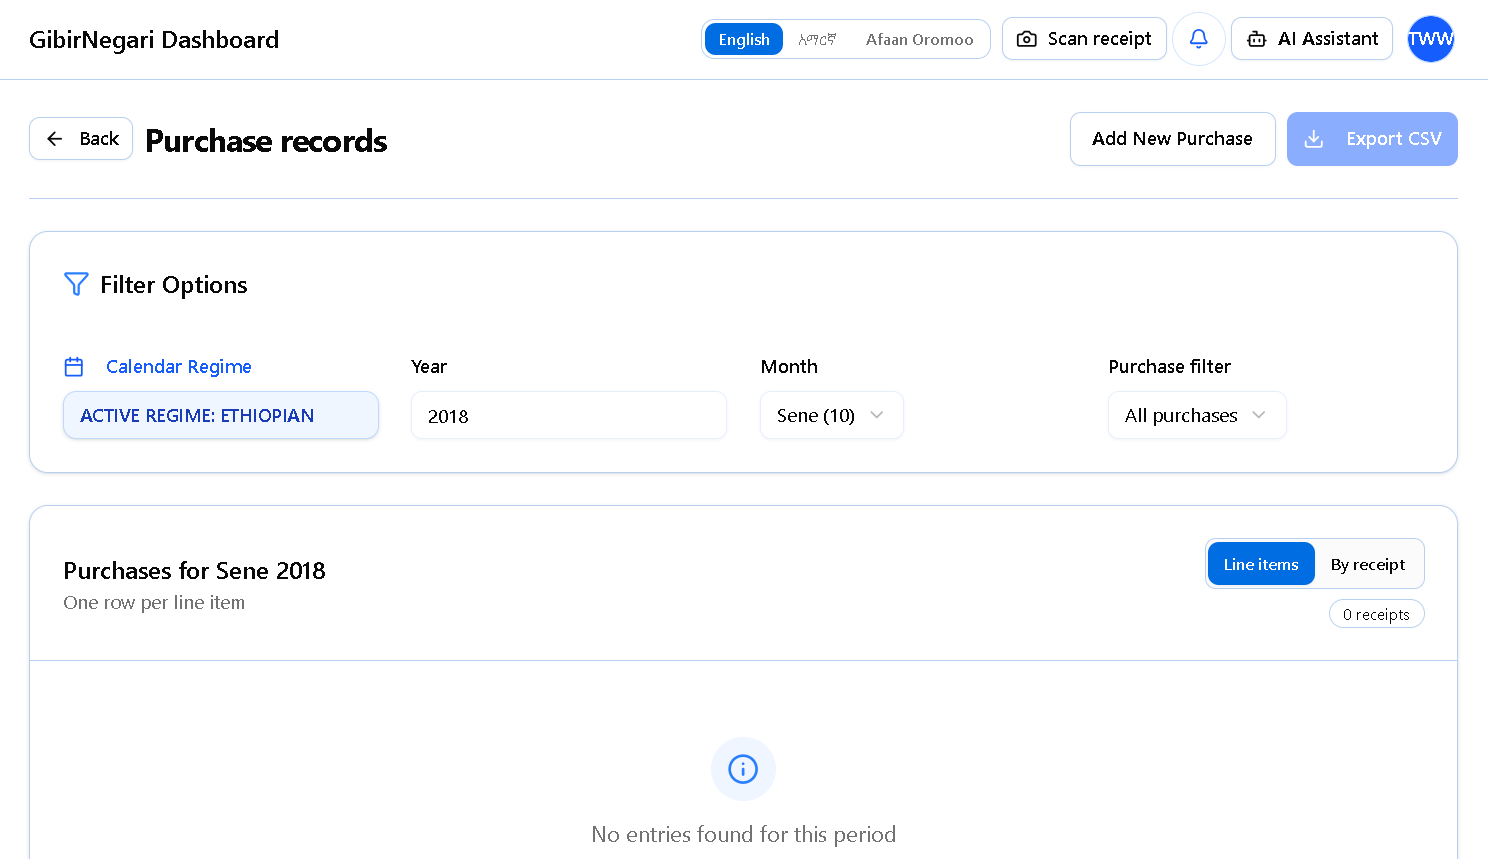
The View Purchases dashboard for tracking, filtering, and managing all your vendor bills.
- "Add New Purchase" Button: Located at the top, clicking this immediately redirects you to the manual entry page to record a new purchase.
- "Export CSV" Button: Downloads your currently filtered list of purchases into a CSV file for your own records or auditing purposes.
- "Filter Options" & Search: Use the Year and Month dropdowns to filter purchases by the active calendar regime. The search bar lets you find a specific purchase by typing a Supplier Name, Receipt Number, or TIN.
- "Filter By Type" Tabs: Quick-filter tabs including "All", "Receipts", "Vouchers", "Rent", "Utilities", "Missing WHT Receipt", "Compliance Issues", and "Needs Capitalization" to narrow down the list.
- "View Modes" Toggle: Switch between "Lines View" (showing individual items purchased) and "Receipts View" (grouping items by their receipt number).
- "Edit" Button: Available on "Draft" (unposted) entries. Opens a dialog to modify all fields of the purchase entry.
- "Delete" Button: Available on "Draft" entries only. Removes the purchase record permanently.
- "WHT" Button: Opens a dialog to add or update the Withholding Tax amount and the WHT Receipt Number for a purchase or group of purchases.
- "Capitalize" Button: Available on capital purchase types (1, 2, 6) that haven't been capitalized yet. Opens a dialog to register the purchase as a fixed asset.
- "Pay" / "Record Payment" Button: Available on "Posted" invoices that are unpaid or partially paid. Opens a modal to record amount paid, payment date, method, and reference.
- Bulk Actions & "Post to GL": Select multiple draft entries using the checkboxes, then click the "Post to GL" button to finalize and post them to your General Ledger, or "Delete Selected" to remove them.
Deleting Purchase Records
To maintain strict accounting integrity, the system enforces specific criteria on when and how a purchase record can be deleted.
- You can only delete "Draft" (unposted) entries.
- Once a purchase is marked as "Posted" to the General Ledger, it is permanently locked to prevent accidental manipulation of your financial books. It cannot be deleted.
- Go to the View Purchases page.
- Locate the specific "Draft" purchase you want to remove.
- Click the "Delete" (Trash icon) button on the right side of that row.
- Go to the View Purchases page.
- Use the checkboxes on the left side of the table to select multiple "Draft" entries.
- Click the red "Delete Selected" button that appears at the top of the table.
4Purchase Analytics Page
This page provides visual insights and charts representing your business expenditure and procurement trends over the selected fiscal year.
- "Fiscal Year" Filter & Sync: Enter a specific year (Ethiopian or Gregorian depending on your settings) and click the "Sync Procurement Data" button to refresh all charts.
- KPI Summary Cards: Quickly view your Gross Expenditure, VAT Paid, Receipt Volume, and Verified Suppliers count for the year.
- Receipt vs. Voucher Breakdown: Shows how many of your purchases came from receipts (VAT-registered) vs. vouchers (unregistered), along with total withholding tax recorded.
- "Spending Trend" Area Chart: Visualizes the month-by-month trends for Net Purchase Value and VAT Paid. You can hover over the graph for exact data points.
- "Category Split" Doughnut Chart: Displays a breakdown of your purchases by expense category (type), showing exactly what percentage of your total expenditure each represents.
- "Strategic Suppliers" Bar Chart: A horizontal bar chart showing your top suppliers ranked by total amount spent.
- "Monthly Audit Log" Table: A granular table showing recent months of Net Total, VAT, Transaction count, and month-over-month trend indicators.
Easy Ways to Enter Purchase Data
Take a Photo (AI Scanner)
Instead of typing everything by hand, you can just take a picture of your vendor receipt. Our smart AI robot will read the picture and automatically fill out the boxes for you, including:
- The supplier's Tax ID (TIN)
- The receipt number and date
- The total price and the tax amount
Note: Your plan decides how many photos you can scan per month.
Upload a Spreadsheet
If your business has many purchases to record, typing them one by one takes too long.
- Download our simple Excel template.
- Paste all your purchases into the spreadsheet at once.
- Upload it back to us. The system checks the whole list for mistakes instantly and saves them all in one click.